Pages

Showing posts with label Tutorials. Show all posts

Friday, 25 July 2014

How to install Android L on your smartphone?

Google Nexus 5 and Nexus 7
As we said in a previous article about Android L, Google had released a beta version of the next big thing in the Android OS series nicknamed Android L. As it is in it's beta stage, developers are allowed to freely try out the new preview to test their apps before the next android version goes live. Well as of now the Android L nickname doesn't seem like the actual name for the next version of android. Only time will tell what they're gonna name it or what sweet edible goodie are they going to name it after. So this article will be dealing with the question of how to install android L on your smartphone. Right now these can only be installed on the Nexus 5 and the Nexus 7.


Warning: Google says the new preview could contain errors and defects and could result in harm to your device, but the good news is that the installation is easily reversible and by restoring the factory settings you could easily revert back to any version of Kitkat, so you dont have to worry about that. 
Related:  Top 5 features of Android L

Now to explain how to install the android L preview on your smartphone step by step below. Keep your eyes peeled. Here we go.


Steps to install Android L:


1) First off, download the installer from here which also has other tools included. These tools are Android ADB and fastboot tools.
 The Android SDK is normally huge but you dont require it to install the Android L image.

2) Follow the instructions from there on and as given in the image below. Do not attempt to change the installation directory.


Command Prompt

3) Now download the file according to the device you possess.

Nexus 5 or Nexus 7

4) Please note that you'll require a tool such as win-zip or 7-zip or winrar which would be used to extract the files from the .tgz archive. This file has to be unzipped two times one after the other because there's another file of .tar format inside. Extract these files to the same folder as the minimal ADB and fastboot (C:\Program Files (x86)\Minimal ADB and Fastboot.)


Installation files

5) After extraction, you'll see a list of folders as given in the image above.

6)Now go to Settings on your smartphone running Kitkat and keep scrolling until you reach the bottom of the screen where you'll see the build number of the device. You have to tap it at least seven times to reveal the developer options which are't displayed in jellybean version 4.2 and later versions. Then when you're in Developer options just check the box that enables USB debugging as shown in the image below:


USB debugging


7) Next, you have to download the USB driver from Google. Here is the link. Extract it to a separate folder.

8) Connect your Nexus via USB and do remember it to have it powered on. Now go to the Control panel on your PC and then go to Devices and Printers. Your device is listed there among other devices. On windows 8 PCs it will be listed as MTP under Multimedia devices. Right click on it and go to properties. Now press the hardware tab and select your device, i.e., Nexus 5 from the list and then click properties. Now you have to update the driver, and pointing it to the folder where you extracted the Google USB driver.

As you're done, it should show the device as Android composite ADB interface. Soon afterwards, you'll be prompted by windows with the message, "Allow USB debugging?" Select "Always allow from this computer" and press OK.


Devices

9) As soon as you're done with the previous step, Switch off your device and let it stay connected to the port as it was. Now you have to use an particular key combo to put the device in "fastboot" mode.

In case of the Nexus 5, the combo is holding both the volume control buttons and the power button all at the same time. In case of Nexus 7, it is volume down and power buttons at the same time. After you're done with the appropriate combo, you should see the screen as below:


Root your phone

10) Now carefully see what comes next in these steps. If the Lock state remains locked(that's normal), then all you gotta do now is type "fastboot oem unlock" without the quotes and press enter. You'll get to the screen that is given below in the image. Switch between Yes and No with the volume control and to select YES, press the power button.
Note: These actions will erase your device, so make sure you have backed up your device first.

11) You can install the Android L firmware now with the boot loader being unlocked. Now type flash-all. You'll see that the process will begin as shown in the image below.


Command Prompt

                                                                                                                                                        
12) When you're done with this process, locking the bootloader again for security reasons. Start the device in fastboot mode again and then type fastboot oem unlock. If you lock the bootloader, that wouldn't result in loss of user data but if you unlock the device again, user data is lost.


Steps to uninstall Android L and restore all factory settings:

Now reverting back to the same old factory settings is as much the same process as installing it.

1) Download the right version of Kitkat from here. Choose the appropriate version for your Nexus device.

2) Delete all the previous installation files of Android L from the previously stated directory before extracting the new files to it.

The files given in the image below are to be removed in case you need a reminder.

Installation files

Repeat the steps discussed previously here in this article and the result would be a clean fresh install of the original stock ROM on your Nexus device.

 As you already know that the Android L is presently available only for Nexus 5 and  Nexus 7 so now if you had a Nexus 4 or a Nexus 7(2012) by chance and wanted to install Android L, read this article.

Read More

How to install Android L: Nexus 4 and Nexus 7 2012

Google Nexus 5 and Nexus 7

Hello folks, this one's gonna be a small post as we just wanted to share some updates with old devices in the Nexus line such as the Nexus 4 and the Nexus 7(2012 version). This article would show you how to install the Android L image in the Nexus 4 and Nexus 7 devices in the same way we showed you in the previous article on how to install it on the new Nexus 5 and the Nexus 7 (version 2013). It's pretty simple. if you desperately want to install it for your older devices then, we're just gonna share some links for you to check out and install it like we did in the previous article.

The XDA developers have managed to install Android L on both these old devices.

For a Nexus 4:


Check this thread for a Nexus 4.

For a Nexus 7(version 2012):


This thread if you have an old Nexus 7.

Warning: These are beta versions and have many defects. A lot of things have not been tested yet on a basic level and the apps are simply not working as of yet.You can find  a list of problems and issues by clicking this link.

Related: Nexus 5 Review

Hope you have enjoyed our article. Show appreciation by commenting on this article.
Cheers!
Peace!

Read More

Sunday, 20 July 2014

How to upload and make downloadable zip files and pdf files in blogger

upload files
Guys, you must have wondered at one point of time about creating a download page for your users/followers of your blog and went on to search for options on the web or if you were a noob then you must have tried to find out just how it is achieved. We'll see how to upload zip files and pdf files and make use of an attachment in blogger. Now, we're not talking about a download page that lets you download images but a page that would also let you download Zip files, rar files, pdf files and other file formats. We all know Blogger doesn't support all the file formats we just mentioned. But what is the solution we have apart from those services like Dropbox, 4shared, mediafire, etc. where you would have to make an account for downloading content in some cases? Why to get yourself in all that mess? We have a very simple option for this to be done. Amazed? Oh you should be. Read on to find out how it's done.


Follow these steps:


1) Head over to Google sites.
2) Sign in with your Google account there.
3) What you see next will be very much the same what's given below in the image.


Create a Website

4) As soon as you this, click the red button which reads Create.
5) After you click create, name your site as shown in the image below.


Choosing a name for your business

6) Now that you're done with the site creation, you'll see your site listed like in the image below.


Blog sites list

7) Click on your site link and you'll be directed to a page that looks like this. Now click on the gear icon at the top right corner of the page and then click Manage site.


Manage site

8) After you click manage, you'll see the next screen like in the image below:


attachment

9) Click on Attachments, then Upload a file of your choice. After you've successfully uploaded a file, right click on the Download link as shown above and press Copy link location as shown in the image above.The Link you've copied can be shared as a download link in any of your posts on your Blog!

Related: Forums for Blogger, Wordpress and other websites

Yes, THAT simple! Why approach other file sharing services when you have Google sites at your disposal. Plus the added advantage of using one single login of your Google account to use this particular service! 
I hope you have learnt how to upload zip files and pdf files and make use of an attachment in blogger.
Happy Blogging!
Cheers!
Read More

Tuesday, 15 July 2014

Forums for Blogger, Wordpress and other websites


Forums
Forums are much needed these days to discuss the various problems netizens face in this world. These places on the internet are gatherings where solutions are most likely found. This is where users share their individual experiences, ask questions, post queries and state accomplishments to inspire and help others. Desired topics can be added and classified helping the users of the forum to be able to follow a particular topic. These provide a user-rich environment where a social environment is well in place and ideas are given out and shared. So we'll be helping you get a forum of your own for your beloved website. Please read on to find out the options and how they can be implemented.


1) Create a forum with Nabble

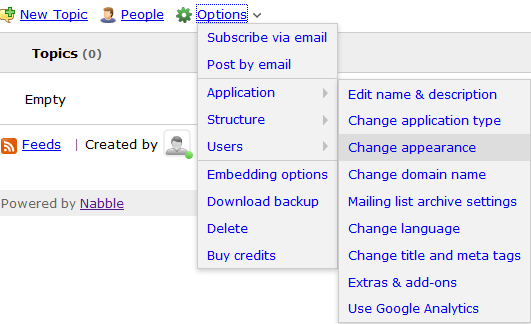
Nabble is a free to use forum provider. All you have to do is go to their homepage and sign up for a free account. The account we sign up for will be the moderator of the forum. After getting a verification mail, and confirming your account with Nabble, we have a wide range of options to customize the forum's look and feel. As given in the Image below, Go to Options, click Application and then click Change Appearance.

Change appearance
We can completely customize the forum's appearance from there including CSS of the forum.

Giving this forum a proper structure

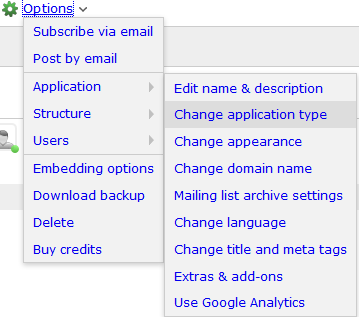
With that being said, we move on to give the forum a proper skeleton. Categorize topics. Click on Options, then click on Application and then select Change Application Type.
See the image below for a visual of the steps.

Change application type


Choose the forum categories and save your changes.

Create Categories

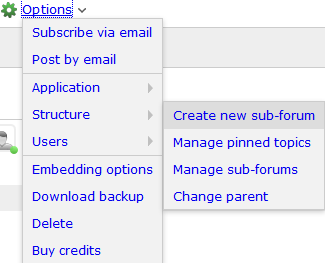
Finally we have to create sub-level categories. Now go to Options again, go to Structure and click Create new sub-forum.
See the image below too.

create new sub forum

Name these categories and you'll have your forum up and going fine.
The other options are for fine-tuning your forum. You can try the other options for creating avatars, user permissions, etc.

Embedding this forum on Blogger Blog

 
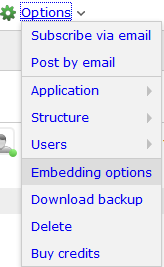
Now for embedding this forum you have created, all you have to do now is click Embedding Options under Options and the copy the javascript code you get.

embedding options


Now that you have the code, go to your Blogger Dashboard, click on Pages on the left sidebar and then click on New Page as shown in the image below.

Blogger new page


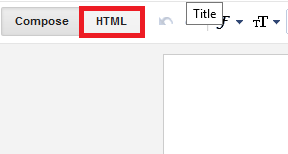
And when you have created a new page, click on HTML as shown in the image and copy the entire javascript code you obtained from the embedding options in Nabble.

blogger page html

And when you have pasted the entire code. You'll have your new forum ready to be used by you and your beloved readers.

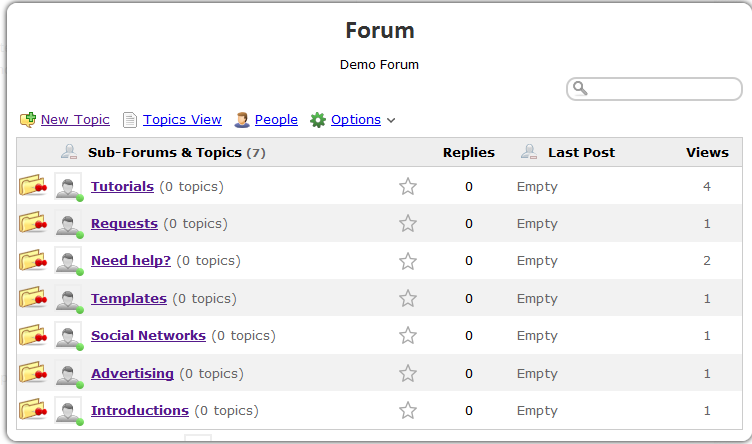
Nabble forum on blogger


2) Create a Forum with Google Groups

 
Now how many of you knew that Google Groups could be used as forums? Not many know this. But Let me tell you of one advantage you would have over other Forum providers that Google has. Google Groups and Blogger require one login and can be montiored very easily from your Google account. So when Google has a forum solution why approach others? But yeah, if you want to customize your forums you must go for other forum providers. Now let;s see how we could achieve the same with Google groups.

Steps:

1) Go to this link.
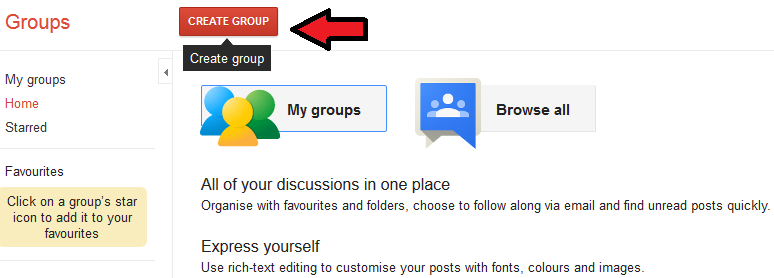
2) Click on Create Group.
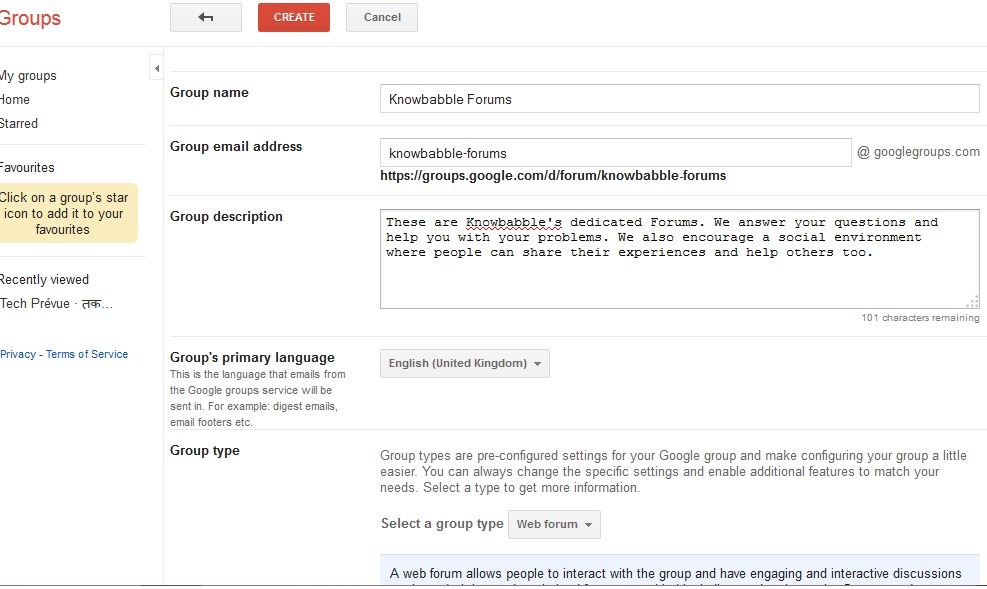
3) After that, Enter the details for Group Name, Group Description and Group Email Address.
4) Set the Group's default language from Group's Primary Language and then select the Group type.
5) You can also meddle with the Group permissions to achieve your desired requirements.
6) Lastly, Click Create and you're done here.

Visual Steps


google groups create group

google groups settings


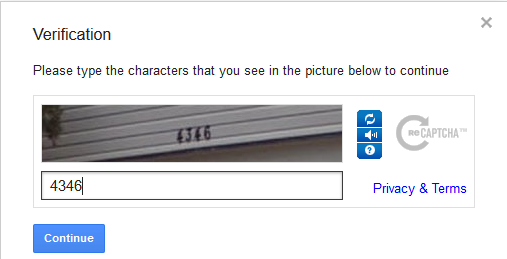
google verification


Google groups embed code


Embed the code in a page in Blogger as we did in the case of Nabble. The same Procedure must be followed. And voila you must see a result like ours down below!

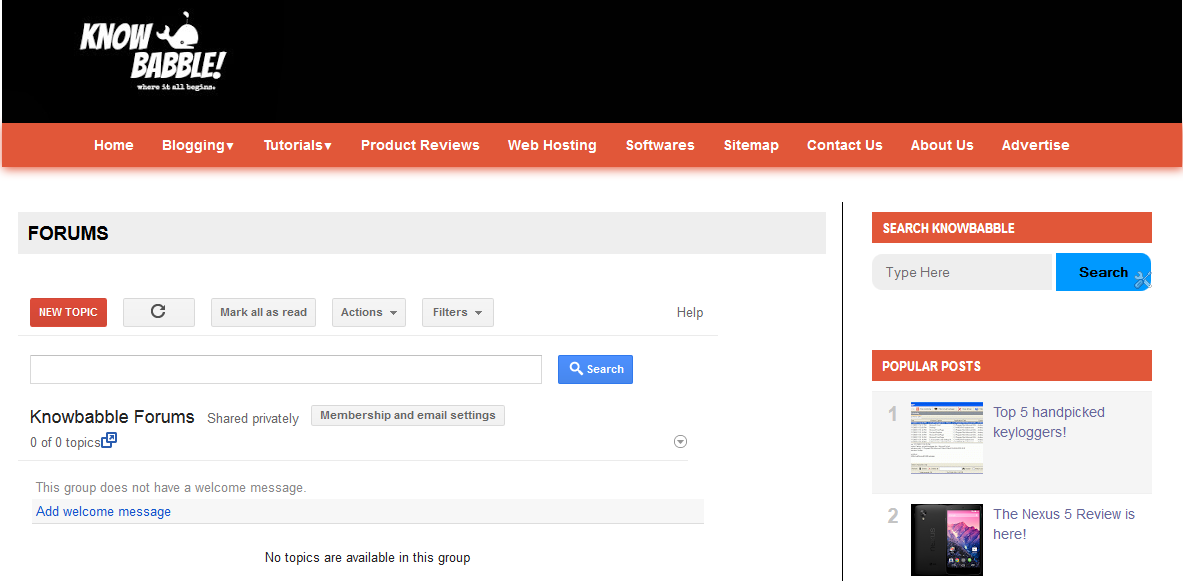
Google groups on Knowbabble

I hope this article has suggested you the best solutions for freely available forums out there. 
Hope you have enjoyed reading and learning something new from us.
Thank you fellow Blogger.
Cheers!
Read More

Tuesday, 24 June 2014

Pcsx2 bios, plugins-setup and configuration

Pcsx2 bios, plugins-setup and configuration
Hey guys! We all love video games don’t we? We all have a little bit of a gamer inside us somewhere. Who doesn’t play video games in this generation? Well not playing is a rare possibility. Games are very crucial for our leisure time and they can act as very efficient stressbusters, only if you don’t overdo it! Well here’s a little something for our video game lovers. This post deals with the PCSX2 bios,plugins and it's setup and configuration.
     Today we’ll be teaching how to configure your PCSX2 properly. Now we know how bad you want to play those PS2 games on your PC. So here it is!
Read More

Monday, 23 June 2014

How to add Google Custom Search Engine bar in Blogger

www.knowbabble.comWhen you own a website, you definitely want people to search for whatever they need on YOUR website rather than others'. Then you wish that your website were like Google. Not to discourage you but you can't make another Google, can you? But don't despair, you can have Google Custom Search bar on your website. Here are steps on how to add Google Custom Search Engine bar in Blogger blog.


Read More

Sunday, 22 June 2014

How to set Alt and Title tags for images in Blogger

Alt and title tags in blogger
Alt and Title tags

Hey buds! If you happen to own a photography blog or just any other blog that would have a lot of pictures in it, then it's highly imperative that you optimize pictures and photographs in your blog posts for the search engines. Popular search engines such as Google itself, Yahoo, and Microsoft's Bing highly favor search engine optimized images.This article shows you how to set Alt and Title tags for images in Blogger. By optimizing the images in your blog posts you have a chance of increasing traffic towards your blog.
Read More

Saturday, 21 June 2014

How to remove powered by blogger attribution

Remove Powered by blogger attribution in blogger
Remove Powered by blogger
Now this is a post exclusively for my friends who use blogger. Newbies, when they step into the blog-o-sphere and opt blogger as their platform might wonder about how to remove the "Powered by Blogger'' attribution in the footer. 
Blogger doesn't normally let you remove it as there is no dedicated option for it to be removed. Now we all know we don't want that in our footers. So here's a really simple way of getting rid of it. Just follow the instructions i have given below:
Read More

Change old Permalink for better SEO in Blogger

custom permalink in blogger
Now at this time i want to teach you a trick that might help you with your search engine rankings. It's a pretty simple trick. First let's talk about the common errors we tend to do while deciding the permalink of your blog post. Yes we will we talking about setting optimized permalinks that will contribute towards better SEO and search engine rankings.
This post article deals with how to change  the old permalink to the new custom made permalink to get better search engine rankings by better search engine optimization. Keep reading to find out more about this.
The permalink is primarily set by default to http://exampleblogname.blogspot.com/yyyy/mm/blog_post_example.html‘.
Read More

Friday, 20 June 2014

10 ways to drive traffic to your website using Google+

Google plus as we already know doesn't have that kind of magic that Facebook, twitter and youtube possess but for bloggers it still can act as a boost to their search engine ventures. As it is owned by Google inc., bloggers everywhere can truly enjoy its search engine benefits. Google favors the people who use Google plus.

Google plus, despite its unpopularity continues to grow as it is the property of Google inc. which makes sure that it's users use its services even if it were to enforce its services upon them such as in the case of its messaging application Hangouts. So with Google plus under Google's wing, it pretty much continues to gather and grow users whether they like it or not.
Listed down below are ten benefits users can share:
Read More

Sunday, 15 June 2014

How to watch FIFA World Cup Brazil 2014 on mobile devices.

FIFA world cup brazil 2014
 At this time around the year, it is the festive season of the FIFA world cup. Brazil has been given the chance to host this mighty occasion which occurs every four years i.e., the FIFA world cup 2014. Brazil is the greatest spearhead in the football sphere worldwide and has a pretty fierce reputation,
hence the chance of hosting the world cup despite suffering from financial and other internal problems. 

Read More

Thursday, 12 June 2014

Hack facebook

Facebook hacking
Hack facebook
Okay, for this to work, you should have physical access to the victim’s computer or make the victim use your computer. The method we are going to discuss now is by using a keylogger.
So, what is a keylogger?
It is EXACTLY what you guessed it is! Simply put, a keylogger logs all your keys. More simply put, a keylogger saves everything you type on the keyboard. From email ids to passwords to whole chat conversations. EVERYTHING is saved without you even knowing it! 

Read More

Saturday, 7 June 2014

How to make my browser remember passwords

 Well, Hello people! And welcome back.
I have been receiving requests from a quite a number of people now, to write a post regarding the steps involved to make your beloved browsers like Chrome, IE, and Firefox to remember your passwords for like everytime you log in.
It's pretty simple. Not to worry.
First lemme get it straight with what an ideal password should be like.
Read More

How to recover files using Recuva


www.knowbabble.comHello friends! The other day I was talking to my aunt in Oman when she mentioned how she had lost all data from her phone, micro SD card to be specific. I told her not to save any new data in the SD card and to immediately eject it from her phone. WHY? Because new files often overwrite the deleted data, form overwritten clusters that hinder the recovery process.
Anyway we spoke, this lead to that and here it is :
Read More

Thursday, 15 May 2014

How to remove showing posts with label message in blogger.

Hey guys! What's up? Ever wondered how to get rid of that ugly "Showing posts with label..." message you get while you click on a certain label on your blog in Blogger? Well let's just put your curiosity to rest, shall we?
Work your way down here and follow the steps carefully to get rid of that bloody message. Okay enough swearing, it's just that i wonder why Google still puts up with this miserable message. It looks so unprofessional, doesn't it? Okay enough swearing, we have a cure. Read on. :P
Read More

Monday, 12 May 2014

Best ways to convert pdf to word

Tonight, I'll be writing down a few ways to convert PDF (.pdf) files to WORD(.doc/.docx) files. These ways might be obvious and known to  a lot of you people out there but there are still people who could not know about this and benefit from this post. And I bet there are a lot of people who do not know how to do it accurately too.
For those people who do know the basic methods, i suggest you check out another one of those methods for achieving the same.
 So here's how..

Read More

Saturday, 26 April 2014

How to get your website noticed in Google?

So what does it take to get your site noticed by google? For you to run a successful online blog, your website should be visible to most search engines like google, yahoo, bing to name a few.
But here we will be discussing just how it is done in the case of the most popular search engine there is, i.e., GOOGLE. Fasten your seat belts now, as i give you an explanation about how it's done.

Well, some of the steps required include setting up a Webmaster Tools account, submitting your website's sitemap, and making sure your site will be noticed.
Read More

Tuesday, 11 February 2014

How to clean your computer with CCleaner


Hello and welcome back!
The more we use our computer, the more junk gets accumulated. It slows down the performance of our computer. CCleaner software is the best clean-up utility I have been using since I-can't-remember-when!
Now what does this do? Here it is:
  •   It empties the Recycle Bin, Windows Explorer thumbnails : recently opened files and folders, etc..
  •  Deletes internet browsing history, cache, cookies, download locations, recent URLs that you have typed and MUCH MORE. 
Read More

Thursday, 23 January 2014

How to turn laptop into a Wifi router.

Are you that person who doesn't want to shell out extra bucks for buying a router? Then this post right here is good news for you as you can now turn your laptop into a working router!
How amazing is that,right?
Cause you wouldn't have to buy another equipment at all.
Voila, Money saved!
Do you want to know how to turn your laptop into a wifi router?
Read on to find out ways to turn your laptop into a router!
 

Read More

Friday, 17 January 2014

Soundwire- app to transfer sound


This is an android application which allows you to transfer sound from your pc to your android phone!
Features of Soundwire: 
1.Selective sound transfer from PC to android.
2.Multiple connections. 
3.Live audio capture and streaming.

Technology used:  1.Server-Client model
2.Server side -(Visual basic) 
3.Client side-( android) 
Required:
1.A Wifi enabled Laptop 
2.Android devices 
3.Download   SOUNDWIRE SERVER for PC
4.Download  SOUNDWIRE APP from google playstore!
Read More

About us

About us

Labels

Follow on Bloglovin

Say no to plagiarism